
Deploying with Kamal from GitHub Actions
No. 25
Imagine this: you merge to main, and a minute later your app is live on fresh servers. No SSH keys to manage, no ports open to the world, and nothing to babysit.
That's our setup with Kamal Deploy and GitHub Actions, and you can have it running today. This article covers how to build it, including a not-so-fun Docker surprise that quietly bypasses your firewall, and the one-line fix.
Start here: this article assumes both of our earlier Ubuntu articles are done. Securing Ubuntu server access with Tailscale gets the server onto your tailnet with a tag and closes every inbound port. Cloudflare Tunnels on Ubuntu serves your applications to the internet without opening any of them back up.
With those two in place, a server is reachable by exactly two routes: you, over Tailscale, and your visitors, through a tunnel. Deploying has to fit through the first one.
Kamal deploys containerized apps by logging into your servers over SSH and running docker commands. Normally that means a private SSH key stored as a CI secret, plus a server with port 22 open to the internet. We have neither. Instead, the GitHub Actions job joins our tailnet for the length of the run, and Tailscale SSH vouches for it. There is no key to leak and no key to rotate.
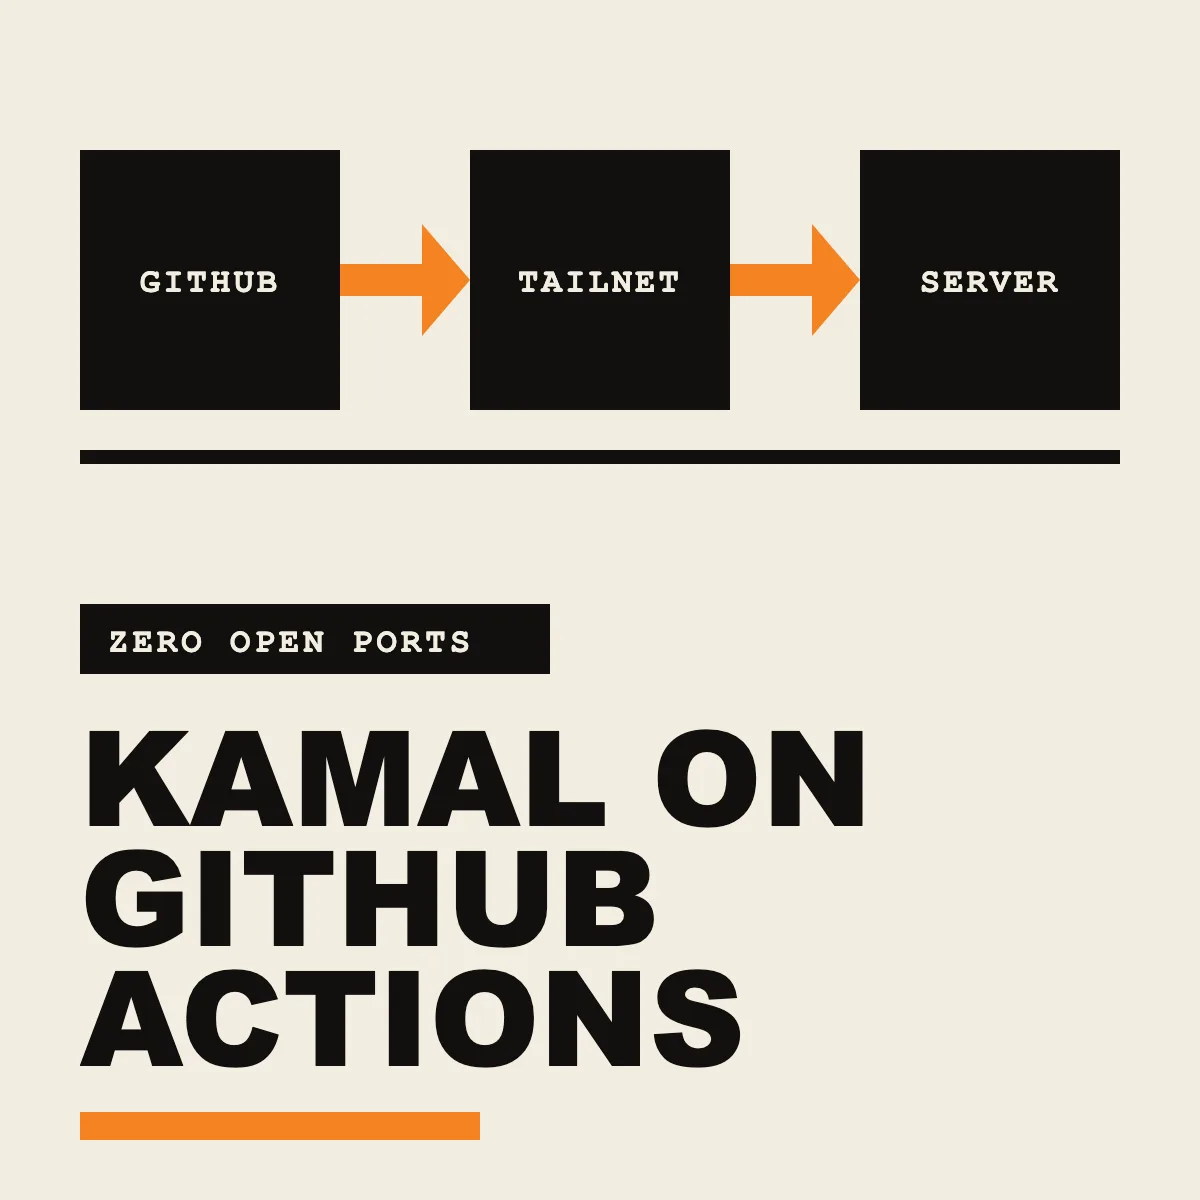
Here's the whole path of a deploy:
- A push to
mainstarts a GitHub Actions job. - GitHub gives the job a short-lived OIDC token, and Tailscale swaps it for a temporary node tagged
tag:github-action. - Kamal builds your image right there on the GitHub Actions runner and pushes it to the GitHub image registry.
- Kamal connects to the server as the unprivileged
kamaluser, over Tailscale SSH, and tells it to pull the new image and run it behindkamal-proxy. - Cloudflare Tunnel delivers visitors to
kamal-proxyonlocalhost:80.
What's in this guide
- Two users, and root never logs in
- Part 1: Let CI onto the tailnet
- Part 2: Prepare the server
- Part 3: Set up the application
- The first deploy
- Point the tunnel at it
- Verify that nothing is exposed
- If you get locked out
Two users, and root never logs in
We use two accounts on every server:
- An admin user is for people, and has sudo with a password. The earlier articles used
ubuntu, so that's what we'll call it here. kamalis for deploys, whether by CI or by hand. It has no password and no sudo. It is in thedockergroup, which is all Kamal needs.
Note: Membership in the
dockergroup is effectively root, because anyone in it can mount the host's filesystem into a container. Keep it to this one user, and keep your own admin work onsudo docker.
Part 1: Let CI onto the tailnet
You do this once for your whole organization, not once per server. Skip anything that is already set up.
Tailscale policy
The Tailscale article declared tag:section-server for our servers. Open Access controls in the Tailscale admin console and make sure your policy has all of the following, adding whatever is missing. Besides a second tag for the CI jobs, the grants let admins and only the CI tag reach our servers, and only on port 22. The ssh rules say who may log in once they get there:
"tagOwners": {
	"tag:github-action":  ["autogroup:admin"],
	"tag:section-server": ["autogroup:admin"],
},
"grants": [
	{
		"src": ["autogroup:admin"],
		"dst": ["*"],
		"ip":  ["tcp:22"],
	},
	{
		"src": ["tag:github-action"],
		"dst": ["tag:section-server"],
		"ip":  ["tcp:22"],
	},
],
"ssh": [
	{
		"action": "accept",
		"src":    ["autogroup:admin"],
		"dst":    ["tag:section-server"],
		"users":  ["ubuntu", "kamal"],
	},
	{
		"action": "accept",
		"src":    ["tag:github-action"],
		"dst":    ["tag:section-server"],
		"users":  ["kamal"],
	},
],
Grants decide who can reach port 22. The ssh rules decide who may log in once they get there, and as which user. Admins can log in as the admin user, or as kamal to deploy by hand or poke at containers. CI can log in only as kamal, so it never gets sudo. An accept action logs in without a browser check, which a CI job can't complete.
Note: Grants are additive. New tailnets start with an allow-all grant (
"src": ["*"], "dst": ["*"], "ip": ["*"]). If it's still in your policy, the CI job can reach everything on the tailnet regardless of the rules above, so remove or narrow it.
Federated identity
Next, tell Tailscale to trust GitHub's OIDC tokens. In the Tailscale admin console, go to Settings > Trust credentials and add a credential of type OpenID Connect:
- Issuer: GitHub Actions. If it isn't listed, use the custom issuer URL
https://token.actions.githubusercontent.com. - Subject:
repo:your-org@your-org-id/*:environment:Production - Scope: Auth Keys > Write
- Tag:
tag:github-action
The subject is the part that keeps strangers out. It limits the credential to jobs from your organization's repositories that run in a GitHub environment named Production, which we'll create for each repository and restrict to the main branch shortly. Narrow it to a single repository by replacing the * with your-repo@your-repo-id.
Note: GitHub puts numeric IDs in the subject, as
repo:your-org@your-org-id/your-repo@your-repo-id:..., for repositories created after July 15, 2026 and for older ones that have opted in. That is the form to use, and the ID is what makes it match. Find yours withgh api orgs/your-org --jq .idandgh api repos/your-org/your-repo --jq .id. A repository created before that date that hasn't opted in still gets the olderrepo:your-org/your-repo:...form. For those, drop the@and ID from the subject, or opt in from your organization's OIDC settings.
Generate the credential, and note its Client ID and Audience. Neither is a secret. They only identify the trust relationship, so we store them as variables rather than secrets.
Share the identity across repositories
Rather than copy those two values into every repository, set them once at the organization level. The GitHub CLI needs the admin:org scope for that:
gh auth refresh -h github.com -s admin:org
gh variable set TAILSCALE_CLIENT_ID --org your-org --visibility private --body 'your-client-id'
gh variable set TAILSCALE_AUDIENCE --org your-org --visibility private --body 'api.tailscale.com/your-client-id'
Note: A repository or environment variable with the same name beats the organization's value. If you tried this in a single repository first, delete the old copies, for example with
gh variable delete TAILSCALE_CLIENT_ID --repo your-org/your-repo --env Production.
Part 2: Prepare the server
Connect to the server from your computer over the tailnet, using your server's Tailscale IP address (we'll write it as 100.x.y.z):
ssh [email protected]
Confirm the server's SSH setup
The Tailscale article turned on Tailscale SSH and turned off the regular OpenSSH server, so the login above went through Tailscale. Confirm both. RunSSH should print true, the tag should read tag:section-server, and both OpenSSH units should report inactive:
sudo tailscale debug prefs | jq .RunSSH
tailscale status --json | jq -r '.Self.Tags // [] | join(", ")'
systemctl is-active ssh.socket ssh.service
If RunSSH isn't true, run sudo tailscale set --ssh, now that your ssh rules are in place. If OpenSSH is still active, finish the "Turn off the regular SSH server" section of the Tailscale article.
Automatic security updates
A server you never log in to still needs its security patches. Let Ubuntu install them daily, but never reboot on its own, so two servers behind the same load balancer are never restarted at the same time. Ubuntu usually ships with this on. Writing the settings down makes sure of it:
sudo apt install unattended-upgrades
sudo tee /etc/apt/apt.conf.d/20auto-upgrades >/dev/null <<'EOF'
APT::Periodic::Update-Package-Lists "1";
APT::Periodic::Unattended-Upgrade "1";
APT::Periodic::AutocleanInterval "7";
EOF
sudo tee /etc/apt/apt.conf.d/52unattended-upgrades-local >/dev/null <<'EOF'
Unattended-Upgrade::Automatic-Reboot "false";
Unattended-Upgrade::Remove-Unused-Dependencies "true";
EOF
sudo systemctl enable --now unattended-upgrades.service
Do a dry run to confirm it works:
sudo unattended-upgrade --dry-run --debug 2>&1 | tail -n 5
Some updates, such as a new kernel, only take effect after a reboot. Every so often, check whether a server is waiting for one:
test -f /var/run/reboot-required && echo "reboot required" || echo "no reboot needed"
If it needs one, reboot one server at a time, so the others keep serving, and wait for it to come back before you do the next. Kamal starts your containers with a restart policy, so your apps come back on their own.
Install Docker
Add Docker's package signing key and repository:
sudo install -m 0755 -d /etc/apt/keyrings
sudo curl -fsSL https://download.docker.com/linux/ubuntu/gpg -o /etc/apt/keyrings/docker.asc
sudo chmod a+r /etc/apt/keyrings/docker.asc
echo "deb [arch=$(dpkg --print-architecture) signed-by=/etc/apt/keyrings/docker.asc] https://download.docker.com/linux/ubuntu $(. /etc/os-release && echo "$VERSION_CODENAME") stable" | sudo tee /etc/apt/sources.list.d/docker.list >/dev/null
Install it:
sudo apt update && sudo apt install docker-ce docker-ce-cli containerd.io docker-buildx-plugin
Docker keeps every container's logs forever by default, so a chatty app can eventually fill the disk. Rotate them:
sudo tee /etc/docker/daemon.json >/dev/null <<'EOF'
{
	"log-driver": "json-file",
	"log-opts": {
		"max-size": "10m",
		"max-file": "5"
	}
}
EOF
sudo systemctl restart docker
sudo systemctl enable --now docker
Create the kamal user
Kamal runs docker as its SSH user and never uses sudo, so the user only needs to be in the docker group. We create it as an ordinary user with a normal home directory in /home/kamal, and that home matters:
- Kamal keeps its own files there, in
.kamal. - Kamal's
docker loginto your registry writes~/.docker/config.json. - Without a home, a session starts in
/, wherekamalcan't write, and deploys fail.
It also needs a real shell, because Tailscale SSH and Kamal both run their commands through one. useradd leaves the password locked, so nobody can log in with one. Tailscale SSH needs neither a password nor a key. The ssh rules in your policy decide who gets in.
id kamal 2>/dev/null || sudo useradd --create-home --shell /bin/bash --user-group kamal
sudo usermod -aG docker kamal
id -nG kamal
The last command should print kamal docker.
Check it from your computer
Log out of the server and test from your own machine, where you're an admin on the tailnet. First, confirm Tailscale SSH lets you in as kamal and that Docker works. You should get an empty container list, not a permission error:
ssh [email protected] 'docker ps'
Next, check the host key. CI builds its known_hosts file from the host keys Tailscale shares with it, so the key your server presents must be one of them. This is what Tailscale shares:
tailscale status --json | jq -r --arg ip 100.x.y.z '.Peer[] | select(.TailscaleIPs | index($ip)) | .sshHostKeys[]?'
And this is what the server presents:
ssh-keyscan 100.x.y.z 2>/dev/null
One ssh-ed25519 AAAA… line must appear in both outputs. If the first command prints nothing, check that your policy lets your device SSH in and that the server carries the tag.
Note: If you're on a Mac and the
tailscalecommand isn't found, the CLI lives at/Applications/Tailscale.app/Contents/MacOS/Tailscale.
Part 3: Set up the application
These steps happen in each application's repository.
Configure Kamal
In config/deploy.yml, list every server's Tailscale address, and tell Kamal to log in as the kamal user:
service: myapp
image: your-org/myapp

servers:
  web:
    hosts:
      - 100.x.y.z # server-1
      - 100.x.y.w # server-2

# Deploy one server at a time, so the other keeps serving.
boot:
  limit: 1
  wait: 10

ssh:
  user: kamal

registry:
  server: ghcr.io
  username: <%= ENV.fetch("KAMAL_REGISTRY_USERNAME") %>
  password:
    - KAMAL_REGISTRY_PASSWORD

builder:
  arch: amd64

proxy:
  ssl: false
  run:
    bind_ips:
      - 127.0.0.1
  host: app.example.com
  app_port: 8080
  healthcheck:
    path: /up

env:
  secret: <%= ENV.fetch("KAMAL_APP_SECRETS").split.to_json %>
A few notes on this file:
ssl: falseis deliberate. Cloudflare terminates TLS for visitors, and the tunnel handskamal-proxyplain HTTP on port 80. There is no certificate for Kamal to request, and nothing is listening on 443 to receive one.hostis howkamal-proxytells your apps apart. Every hostname in your tunnel points at the samelocalhost:80, and theHostheader does the routing, so one server can run many apps.run.bind_ipsis the line that keeps your server closed. See the warning below.env.secretlists the names of the secrets your containers receive. We don't keep that list by hand. The workflow collects the names of every app secret and passes them inKAMAL_APP_SECRETS, as described in the next section.- We use GitHub's own container registry (
ghcr.io) because the job already has a token for it. The workflow supplies the username, andKAMAL_REGISTRY_PASSWORDis the name of a secret that holds that token, never the token itself. Any registry Kamal supports works, so swap this block for yours. builder.archmatches the servers' architecture, which here is the sameamd64as the runner that builds the image.
IMPORTANT: ufw does not protect Docker's ports. Docker publishes ports through its own iptables rules, and those run before ufw's. By default, Kamal starts
kamal-proxypublishing ports 80 and 443 on every interface, so the moment your first deploy lands,kamal-proxyanswers on your server's public IP address no matter whatufw statussays. That quietly undoes everything the Tailscale article set up.bind_ips: [127.0.0.1]makes Docker publish those ports on localhost only. Cloudflare's tunnel reacheskamal-proxyover localhost, so nothing legitimate is affected.
If you add Kamal accessories, such as a database, that publish ports, bind them to localhost the same way, for example port: "127.0.0.1:5432:5432".
To list your servers' Tailscale addresses without hunting through the admin console, run this from any machine on the tailnet:
tailscale status --json | jq -r '.Peer[] | select((.Tags // []) | index("tag:section-server")) | "\(.TailscaleIPs[0]) # \(.HostName)"'
Kamal reads secrets from a .kamal/secrets file, which names each secret and says where its value comes from. We don't keep real values in the repository, and we don't write that file by hand. Our app's secrets live in the repository's Production environment on GitHub (Settings > Environments > Production > Environment secrets), and the workflow below reads all of them and hands them to Kamal. A secret you add to that environment reaches your app on the next deploy, with no list to keep in step.
Note: The job can see every secret available to it, which includes any repository and organization secrets as well as the environment's. The workflow skips the ones that belong to CI itself, such as
GITHUB_TOKENand anything starting withTAILSCALE_orKAMAL_. Everything else goes to your containers, so keep unrelated secrets out of the environment.
Create the Production environment
The Tailscale credential trusts jobs that run in a GitHub environment named Production, so each application's repository needs one. You'll set this up once per repository.
- In the repository, open Settings > Environments and click New environment.
- Name it exactly
Production. The name has to match the subject you gave Tailscale. - Under Deployment branches and tags, choose Selected branches and tags, then add a rule for
main.
That last step is what makes the environment a lock. GitHub only lets a job use the environment when it runs from a branch the environment allows, and Tailscale only trusts jobs that use it. So a pull request or a stray branch can't deploy, and it can't join your tailnet either. Only code that has reached main can.
Tip: Add Required reviewers to the environment as well if you want a human to approve every deploy.
The workflow
Create .github/workflows/deploy.yml:
name: Deploy

on:
  push:
    branches: [main]
  workflow_dispatch:

permissions:
  contents: read

jobs:
  deploy:
    # Only main is ever deployed, from a push or a manual run.
    if: github.ref == 'refs/heads/main'
    runs-on: ubuntu-latest
    timeout-minutes: 30
    environment: Production
    # One deploy at a time. A running deploy is never cancelled; a newer run waits for it.
    concurrency:
      group: kamal-deploy
      cancel-in-progress: false
    permissions:
      contents: read
      packages: write
      id-token: write
    env:
      KAMAL_REGISTRY_USERNAME: ${{ github.actor }}
      GITHUB_TOKEN: ${{ secrets.GITHUB_TOKEN }}
      # Every secret this job can see, as one JSON object. Never print it.
      DEPLOY_SECRETS_JSON: ${{ toJSON(secrets) }}
    steps:
      - uses: actions/checkout@v7

      - uses: ruby/setup-ruby@v1
        with:
          ruby-version: "3.4"

      - name: Install Kamal
        run: gem install kamal --no-document

      - name: Write Kamal secrets
        run: |
          names=$(jq -r 'keys[] | select(test("^[A-Z][A-Z0-9_]*$")) | select(test("^(ACTIONS_|GITHUB_|KAMAL_|RUNNER_|TAILSCALE_)") | not)' <<< "$DEPLOY_SECRETS_JSON")
          if [ -z "$names" ]; then
            echo "::notice::The Production environment has no app secrets, so none are passed to Kamal."
          fi
          mkdir -p .kamal
          cat > .kamal/secret.jq <<'JQ'
          .[$name] | gsub("\\$(?!\\()"; "\\$")
          JQ
          {
            echo 'KAMAL_REGISTRY_PASSWORD=$(printenv GITHUB_TOKEN)'
            for name in $names; do
              printf '%s=$(printenv DEPLOY_SECRETS_JSON | jq -r -f .kamal/secret.jq --arg name %s)\n' "$name" "$name"
            done
          } > .kamal/secrets
          echo "KAMAL_APP_SECRETS=$(echo $names)" >> "$GITHUB_ENV"

      - name: Read server addresses
        id: servers
        run: |
          echo "hosts=$(ruby -ryaml -e 'puts YAML.load_file("config/deploy.yml").dig("servers", "web", "hosts").join(",")')" >> "$GITHUB_OUTPUT"

      - name: Connect to Tailscale
        uses: tailscale/github-action@v4
        with:
          oauth-client-id: ${{ vars.TAILSCALE_CLIENT_ID }}
          audience: ${{ vars.TAILSCALE_AUDIENCE }}
          tags: tag:github-action
          ping: ${{ steps.servers.outputs.hosts }}

      - name: Trust the servers' host keys
        run: |
          install -d -m 700 ~/.ssh
          tailscale status --json | jq -r '.Peer[] | select((.Tags // []) | index("tag:section-server")) | .TailscaleIPs[] as $ip | (.sshHostKeys // [])[] | "\($ip) \(.)"' > ~/.ssh/known_hosts
          test -s ~/.ssh/known_hosts || { echo "::error::Tailscale shared no host keys for tag:section-server servers"; exit 1; }
          chmod 600 ~/.ssh/known_hosts
          printf 'Host *\n  StrictHostKeyChecking yes\n' >> ~/.ssh/config

      - name: Run Kamal
        run: kamal deploy
Here is what the pieces do:
id-token: writelets the job request the OIDC token that Tailscale exchanges for access.packages: writelets it push the image toghcr.io.environment: Productionis what putsenvironment:Productioninto that token's subject, which is what your Tailscale credential checks for. If the job doesn't declare the environment, Tailscale refuses it. Theifon the job and the environment's branch rule both say the same thing: onlymaindeploys.- The
concurrencyblock queues deploys instead of letting two run at once. - The Write Kamal secrets step passes every app secret to Kamal. GitHub hands the job all of its secrets as one JSON object, and the step keeps the names that look like app secrets. For each one it writes a line to
.kamal/secretsholding a command that reads the value back out of the JSON, not the value itself, so nothing secret lands on the disk. It also exports the names asKAMAL_APP_SECRETS, which is whatenv.secretindeploy.ymlreads. It overwrites any.kamal/secretsin the repository, so keep a local one for deploys outside this workflow. - Kamal expands
$NAMEin a command's output, which would silently cut a secret likea$bshort. The smalljqfilter in.kamal/secret.jqescapes each$as\$, and Kamal turns it back into$. - The
pinginput makes the Tailscale step wait, for up to three minutes, until every server answers. A brand-new tailnet node can take a moment to reach its peers, and without the wait the first SSH connection sometimes fails. - The host key step is the only reason SSH works without a stored key. It writes each tagged server's Tailscale IP and the host keys Tailscale shared into
known_hosts, andStrictHostKeyChecking yesmakes Kamal refuse any other host. Because the policy only lets this job reachtag:section-server, the list is exactly your servers. - The install step takes the newest Kamal release. If you'd rather deploys stay on a known release until you choose to upgrade, add
--versionfollowed by the version you tested.
The first deploy
Commit the workflow and deploy.yml and merge them to main. That push runs kamal deploy. Because we installed Docker in Part 2, Kamal has everything it needs: it starts kamal-proxy on the server if it isn't running yet, then deploys the app. Watch it in the repository's Actions tab.
Most servers need nothing more. If you let Kamal install Docker itself instead, or your app has accessories such as a database that need starting, run kamal setup once from your own computer instead of from CI. Your computer is on the tailnet and can log in as kamal, so it reaches the server the same way CI does. It needs the same registry login and secrets the workflow passes, so export them first. After that, every push to main is a normal deploy, and the Run workflow button redeploys main whenever you want.
Check that the app answers on the server, once per hostname:
ssh [email protected] 'curl -sS -o /dev/null -w "%{http_code}\n" -H "Host: app.example.com" http://localhost/up'
Point the tunnel at it
In the Cloudflare Zero Trust dashboard, open the server's tunnel and add a public hostname for each application, such as app.example.com, with the service type HTTP and the URL localhost:80. That's kamal-proxy, which hands each request to the right app based on the Host header.
Note: The Cloudflare article suggests binding your application to
127.0.0.1so nothing can reach it any other way. Kamal doesn't bindkamal-proxyto localhost unless you ask, which is what thebind_ipssetting indeploy.ymldoes.sudo ufw show listeningshould now showdocker-proxyon127.0.0.1:80, not0.0.0.0:80.
If you run more than one server, give each its own tunnel. Then add each tunnel as an endpoint, <tunnel-id>.cfargotunnel.com, to a Cloudflare load balancer pool. The tunnel ID is on the tunnel's page under Networks > Tunnels. Set each endpoint's Host header to the application's hostname, such as app.example.com. Without it, requests and health checks carry the tunnel's own hostname, which matches neither the tunnel's public hostname route nor the host kamal-proxy expects, so the endpoints stay unhealthy. Keep the weights equal to start with, and add the new origin only once the new server answers its health check.
Verify that nothing is exposed
Finally, check from your computer that nothing answers on the server's public IP address. Run this once the first deploy has finished, because kamal-proxy only starts listening then. We use w.x.y.z as a stand-in for your server's public IP:
for port in 22 80 443; do nc -z -G 4 w.x.y.z $port && echo "$port OPEN" || echo "$port closed"; done
All three should print closed. (On Linux, use -w 4 in place of -G 4.) If 80 or 443 says OPEN, kamal-proxy is still published on every interface. Check that run.bind_ips is in deploy.yml, then reboot the proxy with kamal proxy reboot, and look at sudo ss -tlnp | grep ':80 ' on the server.
If you get locked out
If Tailscale SSH stops letting you in, whether from a policy change or because Tailscale logged out, the closed firewall leaves no other route in over the network. Use your hosting provider's web console to log in to the server as your admin user, then fix Tailscale with sudo tailscale status and sudo tailscale up --ssh --advertise-tags=tag:section-server, or fix the ssh rules in your policy. It's worth knowing where that console lives before you need it.
Conclusion
A push to main now builds your image, joins your tailnet for a few minutes, deploys over Tailscale SSH as an unprivileged user, and disappears again, all without a single SSH key in GitHub or a single open port on your servers.
Cheers 🥂